Although it is possible to connect a keyboard, mouse, and monitor to a Raspberry Pi, it is often more convenient to access the Raspberry Pi via a PC over the local network. We use a Windows PC, and the following shows how we connect it to our Raspberry Pi.
Connect the Raspberry Pi to the local network using an ethernet cable, or insert a Wi-Fi dongle into one of the USB ports (if you have already configured the dongle on your Raspberry Pi). Now connect the 5V power supply to the Raspberry Pi. After around a minute, the Pi will have booted up and be ready.
We will be connecting to the Raspberry Pi via SSH (Secure Shell), so we need an SSH client on our Windows PC. By default SSH is enabled on the commonly used and ‘official’ Raspbian Wheezydistribution. (If you are using a different distribution and SSH is not enabled by default, you will need to hook your Raspberry Pi up to a monitor and keyboard and mess around with the default settings.)
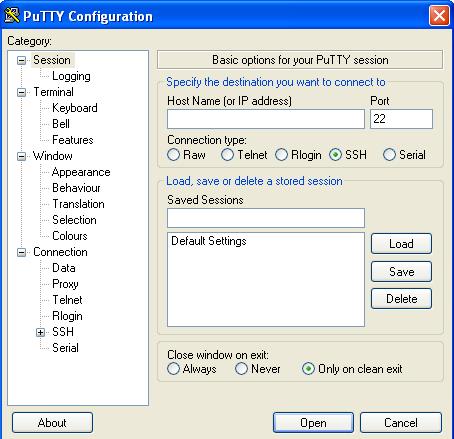
We used PuTTY which can be downloaded from here: download PuTTY. It is a free open source SSH and telnet client; a small executable Windows file, so nothing to install on your PC. Just double click to run it. Now all we need to know now is the IP address of the Raspberry Pi.
When the Raspberry Pi connects to the router it is automatically allocated an IP address. Unless you mess around with the router settings, the next time you restart the router, the Pi may be allocated adifferent IP address. When the Raspberry Pi is connected to its own monitor and keyboard it is very easy to find out its current IP address (typing ip addr show at the command prompt for example), but the whole point of this exercise is to access the Raspberry Pi without having it connected to a monitor. Therefore we need an alternative means of finding out the IP address allocated to our Raspberry Pi.
(NEW Click here to find out how to Assign a Static IP Address to a Raspberry Pi so that its IP address will not change when the router is reset or the Raspberry Pi is rebooted.)
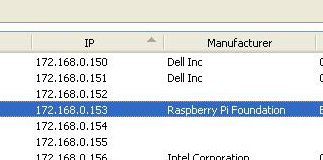
To find out the IP address we downloaded Advanced IP Scanner – a free network scanner compatible with all versions of Windows. Running this and pressing ‘Scan’, all possible IP addresses on the local network can be checked, and the IP address of the connected Raspberry Pi discovered – in this case 172.168.0.153.
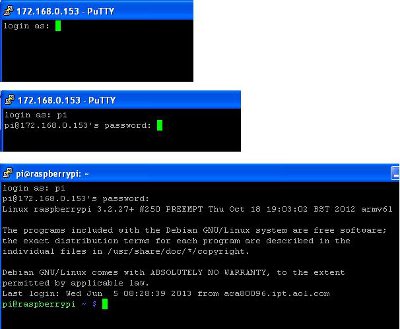
So, now we have the IP address, we enter that at the Host Name (or IP address) prompt in PuTTY and click ‘Open’. After a security alert just warning you to check that you trust the device you are about to connect to, a terminal screen pops up. Login as ‘pi’ and enter the password ‘raspberry’ and you are connected and free to use the Raspberry Pi command line directly from your PC.