In our article Connecting to Raspberry Pi from PC via SSH we showed how to connect remotely to your Raspberry Pi from another computer on the network – particularly useful if you want to run your Raspberry Pi headless, i.e. without its own monitor, keyboard, and mouse.
Your network connected Raspberry Pi is assigned an IP address by your network router. By default this will be a dynamic IP address – i.e. the router could change it to a different IP address if you disconnect and then reconnect the Raspberry Pi or if you reset the router.
This can be very inconvenient with a headless Raspberry Pi as you would have to scan the network to find your Raspberry Pi each time its IP address is changed, and any automated scripts which use the IP address to communicate with your Raspberry Pi will need to be amended.
In order to avoid the problems associated with dynamic IP address, you can give your Raspberry Pi astatic IP address – i.e. an IP address which is fixed even after a router reset or disconnection of the Raspberry Pi.
Static IP Address
The file we need to modify to give the Raspberry Pi a static IP address is located here/etc/network/interfaces. Type in the command:
cat /etc/network/interfaces
to view the relevant current settings.
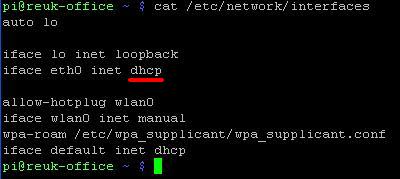
DHCP underlined above shows that currently this Raspberry Pi is being assigned a dynamic IP address
Now we need to collect some information from both the Raspberry Pi and the Router in order to change over to a static IP address.
First enter the following command:
route -n

Note down the router IP address (Destination) and Gateway addresses for your Raspberry Pi.
Next we need to collect some information from the Router to which the Raspberry Pi is connected. Enter the following command:
ifconfig
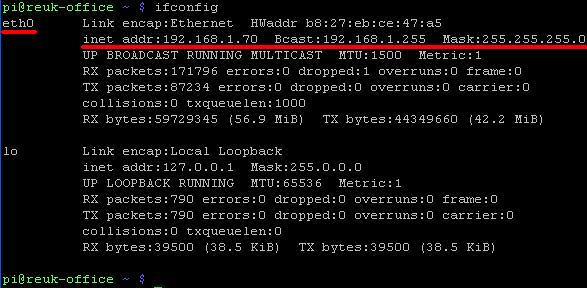
Find the information relating to your ethernet connection (eth0) and note down your Raspberry Pi’s current IP address (inet addr), the broadcast IP range (Bcast), and the subnet mask (Mask) for your router.
Now we have all the necessary information we can modify the network interfaces file. First of all make a backup copy of your exising interfaces file so you can use it later on if something goes wrong! Enter the command:
sudo cp /etc/network/interfaces /etc/network/interfaces.backup
Then enter this command to edit the network interfaces file:
sudo nano /etc/network/interfaces
replacing nano with your preferred text editor if you want.
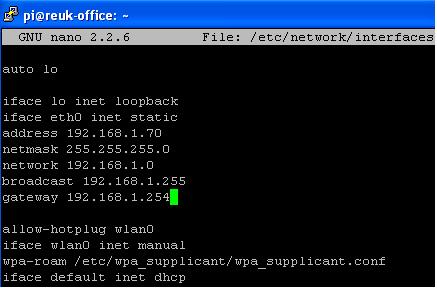
First of all replace the ‘dhcp’ underlined in the screenshot earlier with ‘static’ to give the line:
iface eth0 inet static
Then directly below enter the following using the information you noted down earlier. Type everything very carefully and double check everything before you save the modified file.
address 192.168.1.70
netmask 255.255.255.0
network 192.168.1.0
broadcast 192.168.1.255
gateway 192.168.1.254
Note that ‘network’ here is the subnet mask IP address. ‘address’ is the IP address you would like to assign to your Raspberry Pi. In this example any value in the range 192.168.1.0 to 192.168.1.255 could have been used for the IP address for the Raspberry Pi, but I just chose to continue using the dynamically assigned IP address 192.168.1.70. If you want to use a different IP address from the range, first scan your network (using something like Advanced IP Scanner) to make sure your chosen address has not already been assigned to another device on the network.
After saving the file, enter the command:
sudo reboot
to reboot your Raspberry Pi with the new settings.
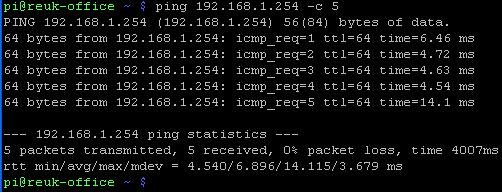
All being well, you will be able to remotely log back into your Raspberry Pi. To double check that everything is okay when you have logged in, ping the Gateway address found earlier – in my case with the command:
ping 192.168.1.254 -c 5
…but substitute in your Gateway IP address.