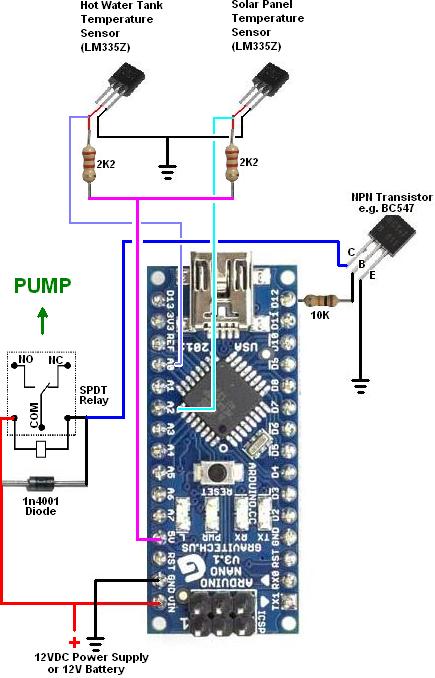
Following on from our recent blog posts Arduino Solar Water Heating Pump Controller and Arduino Introduction, we have received a few requests for the source code (sketch) and design for a very simple Arduino based solar water heating pump controller.
We thought it would be an interesting exercise to show how just a few components and twenty or so lines of code can be turned into quite an effective controller, so here it is.
For the schematic (and our own testing) we used an Arduino Nano, but pretty much any Arduino board could have been used. To that we just need to add a couple of LM335Z temperature sensors, a relay, an NPN transistor (we used a BC547), a few resistors, and a diode.
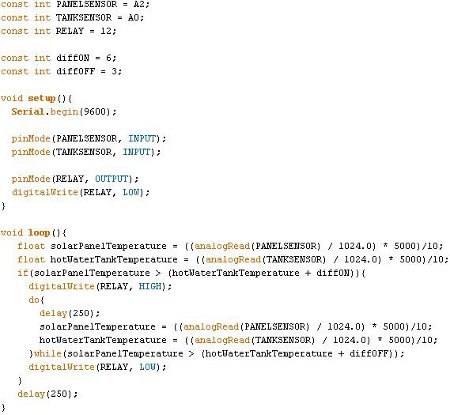
Here is a screenshot of the source code (the link to download it is at the end of this blog post):
This really is about as basic an effective microcontroller based solar water heating pump controller as it is possible to make.
The two temperature sensors connect to the (arbitrarily chosen) A0 and A2 analog pins, and the relay which switches the pump on and off to the D12 digital pin through a transistor (to limit the current drawn from the pin).
The variables diffON and diffOFF are used to set the number of degrees Celcius by which the solar panel must be hotter than the hot water tank for the pump to turn on, and then to turn off respectively. We used 6 degrees for diffON and 3 degrees for diffOFF – you may choose to use different values. These give hysteresis which prevents the pump switching on and off repeatedly and rapidly (since the temperature difference has to fall before the pump is switched off, and then rise before it will be switched on again).
The temperatures are measured every quarter of a second – delay(250) causes the programme to pause for 250 milliseconds. If the solar panel temperature is more than diffON degrees hotter than the hot water tank, the pump will turn on; and then when the temperature difference falls to diffOFF or lower the pump will turn off. And that’s it – simple, but does the job.
These LM335Z temperature sensors output a voltage of 2.73V + (X * 0.01V) where X is the temperature in degrees Celcius. The analogRead command digitises this analogue voltage to a whole number in the range 0 to 1023 with 0 corresponding to 0.00V and 1023 corresponding to 5.00V.
The calculation done on those analogRead 0-1023 values converts them into temperatures in degrees Kelvin. To convert degrees Kelvin into degrees Celcius you just subtract 273.15. That was unnecessary in this example since we are only interested in the difference between the two temperatures, but if you wanted to display the measured temperatures by connecting the Arduino board via USB to a PC that is how you would get them in Celcius.
Obviously there are a lot of things which can be added to this controller to make it more effective and reliable – e.g. time delays before the pump turns on and off, user programmability, manual override, frost protection, maximum temperature shut off, data logging and processing, and real-time temperature and system status display etc, but this is a good starting off point. There are vast amounts of resources online to help you learn more about Arduino – start with the official Arduino website to find out more.
Click here to download the Arduino source code for the REUK Simple Arduino Solar Water Heating Pump Controller as pictured above.
If you have any questions about the above or if you would like to share your modifications or enhancements to the code or design, please email neil@reuk.co.uk.

