Hen House Door Controller with Sounder and Door Locking Solenoid

Pictured below is another special order hen house door controller we have made on request. Our standard dawn/dusk door controller is detailed here: Automatic Dawn/Dusk Hen House Door Controller. For this customer we have added a couple of new features – a sounder/siren and a door locking solenoid.

Hen house door controller with sounder and door locking solenoidThe door is opened and closed automatically using a light detector and some microcontroller logic to determine when it is dawn and dusk respectively.

30 seconds before the door opens or closes and while the door is in motion, a sounder goes off which will hopefully train the birds to realise that the door is opening or closing so that they know what to do; and a solenoid door lock is used to ensure that the door is kept securely closed at night time (since in this particular case a full size shed door is being used instead of the usual drop down bird-sized door).

If you need any type of poultry house door controller, email neil@reuk.co.uk with details of your requirements.

Voltage Measuring Datalogger with micro SD Card

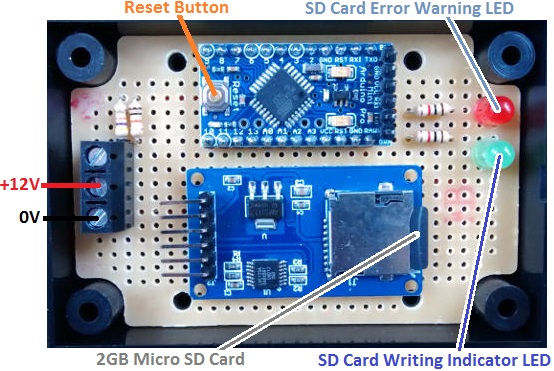
Pictured below is an Arduino-based datalogger we recently made for measuring the voltage output of induced EMF in coils through which a magnet is passing. The voltage output needs to be logged once per second for up to a few hours.

SD card dataloggerThis particular datalogger is 12VDC powered, and will measure and log voltages up to 15VDC. (The induced voltage to be measured in this project has been measured with an oscilloscope not to exceed 5V).

Each time the datalogger is connected to the power source and to the coil to be measured, a new log file is created on the supplied 2GB micro-SD card. An on board reset button can also be used to start a new log file.

On start up or when reset, the SD card is initialised and checked to ensure that it is present and working properly. If it is not, the red LED turns on and stays on to warn the user – there are few things worse than running an experiment only to find that no data was collected. If all is well with the SD card, then once every second the coil voltage is measured and appended to the latest log file.

When the experiments are complete, the SD card can be removed from the datalogger and accessed via a PC for processing and analysis. The generated datalog files are simple text files with each measured data point on a new line in chronological order.

If you need a datalogger,  email details of your exact requirements to neil@reuk.co.uk.

Solderless Power Supply Module for Breadboard

We recently came across this handy little power supply module designed and built for use with prototyping breadboard (MB102 size) by YwRobot in China.
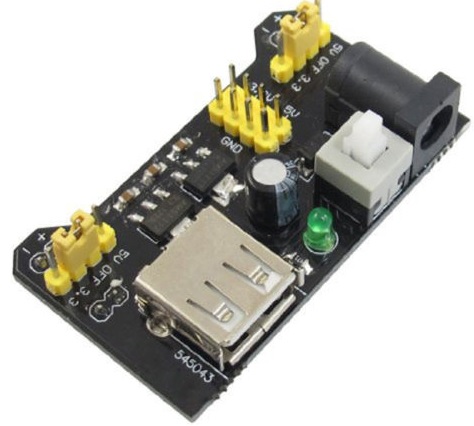
breadboard power supply moduleThis is a very useful device for anyone getting started with electronics thanks to its low cost (approximately £1 delivered) and ease of set up and use.

The module simply plugs into a breadboard and gives two pairs of rails which can be configured to give you 2x5V rails, one each of 5V and 3.3V, and you can also set one or both pairs of rails to 0V.
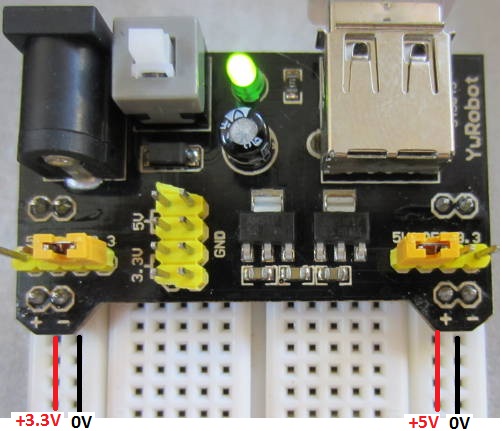
mb102 breadboard power supply modulePictured above we have used the small yellow jumpers to set one pair of rails to 3.3V/0V, and the second pair of rails to 5V/0V. The board is then ready to supply a few hundred mA at 3.3V and 5V to any project you may want to prototype/build on the breadboard.

The module is powered via USB. Virtually everone now has a micro-USB charger at home for mobile phone and table charging etc, so it is surprising that they chose to use a full size USB-A connector. It would have been much better to go for a micro-USB connector.

The module has two low drop linear voltage regulators to supply the 3.3V and 5V outputs. When we tested this with a USB power supply outputting 5.46V, we measured 5.123V on the 5V rail, and 3.286V on the 3.3V rail.

If your USB power supply provides less than 5V (or more likely, you have less than 5V after losses in a long/cheap cable) the 5V rail will always be a few tenths of a Volt lower than the incoming voltage – therefore you cannot guarantee a reliable 5.0V output from this module when powered via USB. Similarly, it is best not to use this connected to a USB port on a PC as the voltage of PC USB ports can jump around a lot depending on what the PC is doing at any particular instant.

There is however a standard DC barrel jack for DC input power. Using a standard 6V DC power supply should give you a full stable 5V output from the module.

There is an on/off switch on the module, with a green LED to show the current status. This is useful not just because it saves you from having to unplug or switch off your USB power supply at the power point, but also because the capacitors in a power supply retain charge after you unplug the power supply and this charge will feed through the module into your electronics project until those capacitors have discharged. That could have unforeseen consequences as the voltage input to your circuit drops.

The quality of the components used and the build quality are as you would expect from a product offered at such a low price, but these modules are still an excellent first purchase for anyone interested in circuit prototyping.

These modules are available on their own, or together with a suitable breadboard and jumper links as a complete starter package. Click here for more information or to make a puchase of one of these power supply modules.
Dawn Dusk Hen House Door Controller with Timer Override

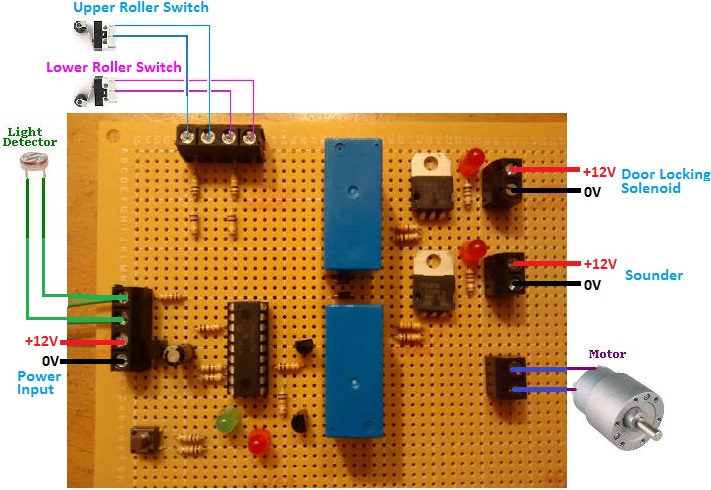
Pictured below is a hen house door controller we recently made for a customer which is a modified version of our standard Dawn Dusk Hen House Door Controller.

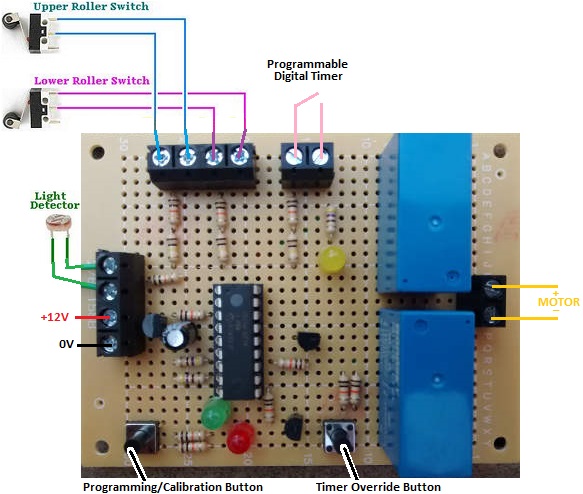
hen house door controller with light detector and timer overrideThis controller will automatically open a hen house door at dawn and close it again at dusk. Dawn and dusk are detected via a light detector, and the user can calibrate the light level at which they consider it to be the transition between day and dusk and between night and dawn to meet their needs.

The modified version pictured above has the additional benefit of a programmable digital timer. We make hen house door controllers with light detectors which automatically detect dawn and dusk, and we also make them with programmable digital timers so that the user can instead set the exact time that the door is to open and close. This particular controller is our first which has both a light detector AND a programmable digital timer for maximum flexibility.

The purchaser of this controller expressed a wish to be able to have the hen house door close at dusk automatically, but also to be able (sometimes) to open the door later (or even earlier) than dawn. Therefore, in the summer when dawn could be at 4am, the timer can be used to keep the door closed until 6am or later to keep the noise down and avoid disturbing neighbours. The programmable digital timer we used can be set with different timings for weekdays and weekends, so for example, the door can be kept closed until much later in the morning on the weekend to keep the noise down.

If you need any kind of poultry door controller, email neil@reuk.co.uk with details of your exact requirements.

Double Controller for De-Stratification

Pictured below is a controller we recently made to de-stratify hot water cylinders. Stratification is the layering of water of different temperatures within a tank or cylinder. It leads to the problem of having a thin layer of extremely hot water at the top sitting above a quantity of much cooler water. Therefore any thermostats or temperature sensors on the cylinder will only see cool water (making the system inefficient), while dangerously hot water comes out of the hot tap.

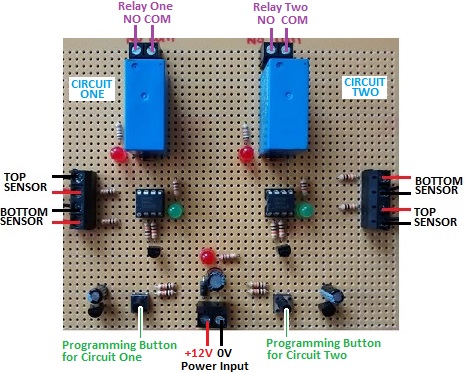
Double de-stratifying Circuit for hot water cylindersThis double controller is basically two of our 2013 solar water heating pump controllers put onto one board with a single power input. There is a top sensor and a bottom sensor for each cylinder to be de-stratified. (We used precision LM335Z temperature sensors for this project)

When the top sensor is measured to be a user set number of degrees (diffON) hotter than the bottom sensor, a circulation pump is turned on via the relay to mix the top layer of hot water into the cooler water below. This heats up the cooler water and cools down the hotter water giving a more consistent temperature throughout. The pump stays on until the difference between the top and bottom sensors has fallen below a second user set number of degrees (diffOFF).

With this particular controller diffON is set in steps of five degrees whereas diffOFF is set in steps of single degrees.

If you need any kind of temperature sensing relay controller or similar, email neil@reuk.co.uk with details of your exact requirements.

Automatic Plant Propagator Thermostat

Pictured below is a thermostat we recently made to maintain the temperature in a plant propagator fitted with 12V heat pads.

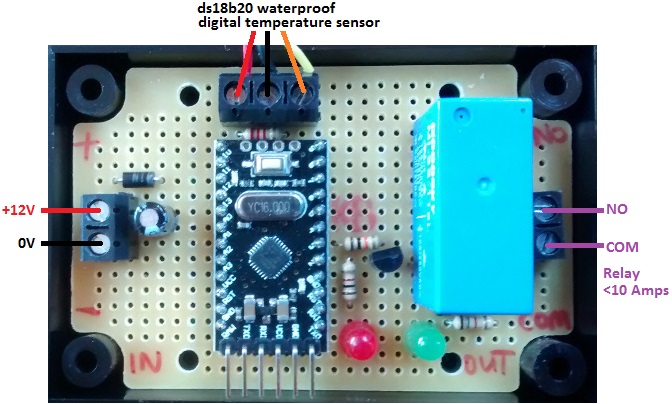
Automatic compost heat pad relay thermostatThe propagator is located in a potting shed with two lead acid batteries charged a 40W PV solar panel with a solar charge controller. Our thermostat includes a waterproof stainless steel encased DS18B20 digital temperature sensor which is to be buried in the moist compost in the propagator. When the measured temperature falls below 17 degrees Celcius, the heating pads are turned on via the on board 10A rated relay, and then remain on until the temperature of the compost reaches 23 degrees Celcius.

Normally for these types of simple thermostat we use a PICAXE microcontroller, but we chose instead to use an Arduino Pro Mini as this meant that we did not have to deal with processing negative temperatures programmatically. (PICAXE only has integer mathematics, so cannot easily deal with fractions of numbers or negative numbers. If the propagator is not used for a while during the winter, below zero temperature could be measured as it is located outdoors.)

If you need any kind of bespoke thermostatic controller, email neil@reuk.co.uk with details of your requirements.

(See here: http://www.reuk.co.uk/wordpress/programmable-automatic-plant-propagator-thermostat/ for a user programmable version of this device for which different temperature ranges can be set.)

Automatic Alarm for Screen Printing Flash Dryer

We were recently commissioned to design and build an automatic warning alarm for use with a screen printing flash dryer by a custom t-shirt print company in USA.

A flash dryer is a special heater which rapidly cures the ink printed onto the t-shirt or sweatshirt. If a shirt is left for too long in the flash dryer it will be scorched and ruined, and with a bit more time even the wooden shirt board around which it is fitted can be ruined. Therefore it is desirable to have a warning alarm sound if a shirt is left in the flash dryer too long by the operator.

alarm timer for screen printing flash dryer

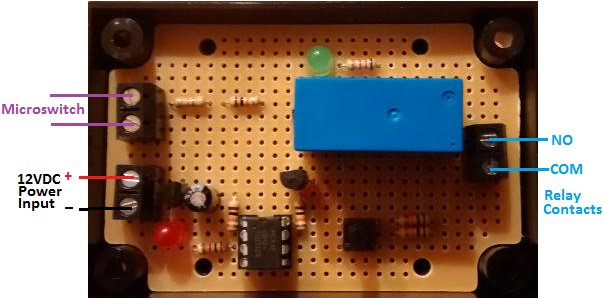
The controller we made is pictured above. There is a microswitch on the flash dryer which closes when the flash dryer is closed over a shirt. The user can programme our controller with the maximum number of seconds they want to leave a shirt in the dryer – e.g. 15 or 20 seconds – and then if that time is exceeded the on board relay closes for 3 seconds to sound a loud alarm connected to it.

When the operator opens the flash dryer, the microswitch opens and the controller automatically resets ready for the next time the flash dryer is used.

If you need any kind of automatic sensor or timer based alarm system, email neil@reuk.co.uk with details of your requirements.

New Raspberry Pi 2 Model B – Six Times More Power

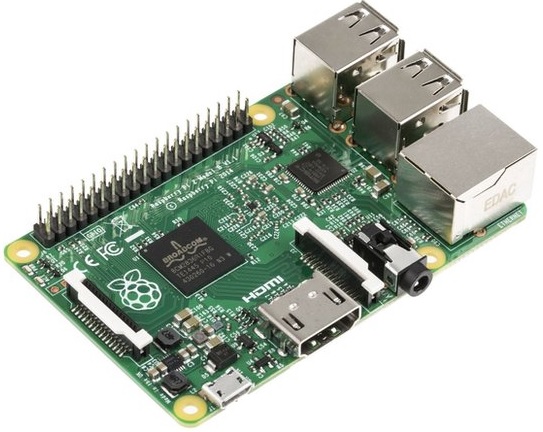
The new Raspberry Pi 2 Model B has just been released, and promises to be six times more powerful than the previous Raspberry Pi models.

Raspberry Pi 2 Model BThe original Raspberry Pi was released around 3 years ago, and since then technology has moved on and competitors have joined the marketplace. The single core 700MHz processor and 512MB of RAM of the recently released Raspberry Pi A+ and B+ make them feel quite sluggish and out-dated, and there are many applications which cannot be used as they run so slowly.

The new Raspberry Pi 2 Model B though has a quad-core 900MHz processor (ARM Cortex-A7) with a full 1GB or RAM,  effectively turned the Raspberry Pi into a low spec PC capable of running the new Windows 10 (which will be offered free of charge for Raspberry Pi to makers!) and the full range of ARM Linux distributions.

The new model is fully backwards compatible with previous models, it will just run everything much faster. You just need the new ARMv7 kernel version of Raspian, and all existing projects will work.

Amazingly, despite the huge lift in specs, the new Raspberry Pi 2 Model B will still be sold for just $35 (around £25-30 in the UK).

Get yours now (in the UK) at cpc.farnell.com.

Low Voltage Disconnect used as Charge Controller

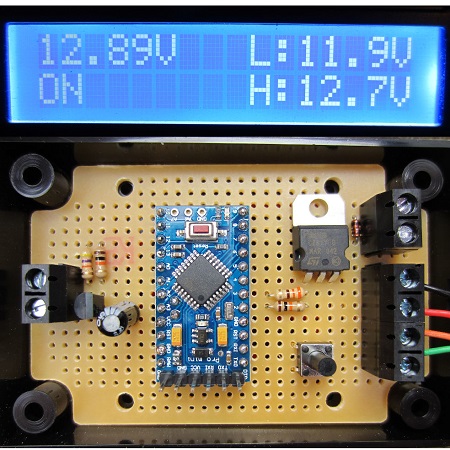
Pictured below is our 12V Programmable Low Voltage Disconnect with Display as sold in the REUK Shop. The product is designed to prevent batteries from being overly discharged and damaged by automatically turning the load devices on or off depending on the measured battery voltage.

reuk programmable low voltage disconnect used as a battery charge controllerWe recently made a few modifications to this design of this LVD for a customer to enable this device to be used as a charge controller; turning it into a high voltage disconnect.

There is a battery bank and a generator which is used to charge it. We replaced the standard 12V output on the low voltage disconnect board with a relay so that it could switch the generator on and off automatically. We then changed the code on the Arduino microcontroller so that the relay would open (turning off the generator) if the battery bank voltage exceeded a user set value, and would then close the relay again (turning on the generator) when the battery voltage fell below a second user set value. By doing this the batteries are well cared for – never being overcharged, and never becoming overly depleted.

If you require a low voltage disconnect or a modification made to one of our LVD products such as this charge controller, please email neil@reuk.co.uk with details of your requirements.

Programmable Low Voltage Automatic Battery Charger

Our Mini Programmable 12V Low Voltage Disconnect (LVD) is designed to disconnect loads from batteries when the battery voltage falls below  a user set value, and then reconnect the loads when the battery voltage gets back above a second (higher) user set value.

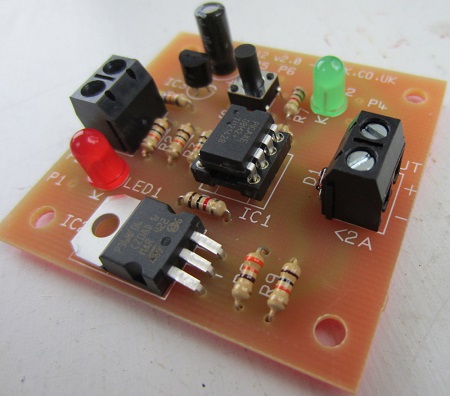
low voltage connect from REUK low voltage disconnectWith a few modifications to the code on the microcontroller of this device it can also be reconfigured as a low voltage connect – a device which will (typically) be used to connect a charger to the battery when its voltage gets low, and then disconnect it when the battery voltage gets higher after charging.

Today we made such a low voltage connect for a customer with a semi off grid garden office, a PV solar charged battery bank, and a selection of lights, 5V chargers, and other low voltage DC loads to be powered. He has a mains powered 5A bench power supply which he wanted to automatically connect to the battery bank via a solid state relay (SSR) when the battery bank voltage fell due to a period of poor solar generation (English weather) or from using a lot of battery power.

With our low voltage connect controlling the SSR, the battery bank will never be able to get overly-depleted and battery power will always be available to power the garden office.

If you need any kind of low voltage disconnect, low voltage connect, or high voltage disconnect etc, please email neil@reuk.co.uk with details of your requirements.