12V Regulator with Low Voltage Disconnect (LVD)

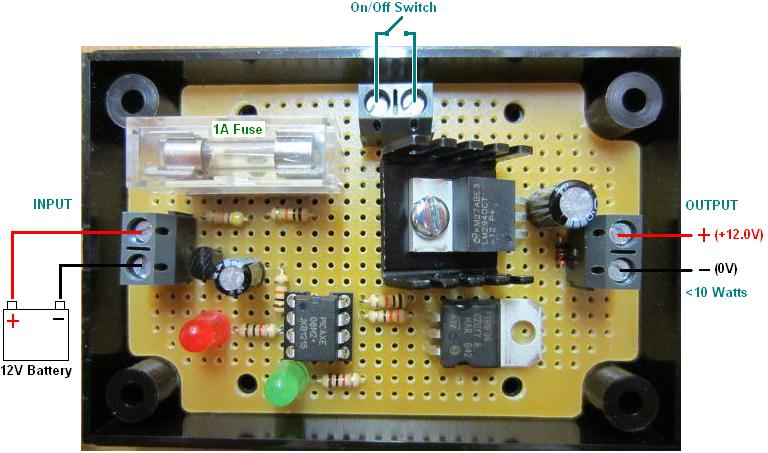
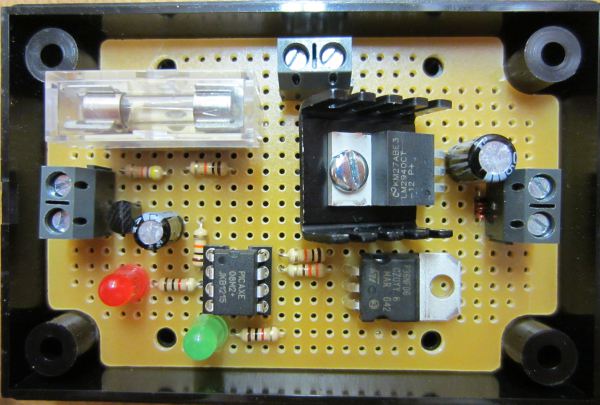
Pictured below is our new 12V regulator with integrated Low Voltage Disconnect (LVD) battery protection for LED lighting applications.

12v low voltage disconnect (LVD) with 12V low dropout regulator outputThis device will supply power to up to 10 Watts of LED lighting at a safe voltage when connected to a 12V battery while at the same time protecting the battery from being excessively discharged and therefore having its lifespan reduced. It is a combination of our established 12V regulator and low voltage disconnect technologies.

Connections for 12V regulator with low voltage disconnect - REUK

We currently only have this item for sale here: 12V regulator with LVD, but we will be adding it to the REUK Shop soon.

New Solar Water Heating Pump Controller with Waterproof Sensors

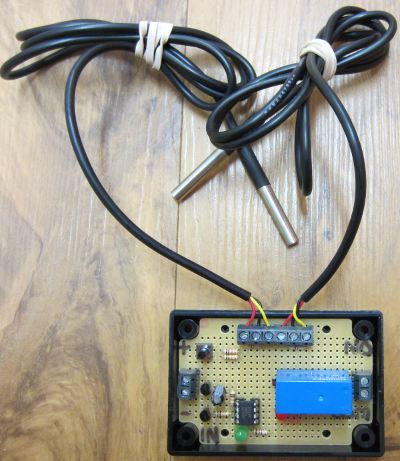
Pictured below is our new solar water heating pump controller with waterproof sensors. It is heavily based around our standard 2013 Solar Water Heating Pump Controller, but modified to use waterproof DS18B20 digital temperature sensors in place of the LM335 analog temperature sensors we normally use.

Solar water heating pump controller with waterproof temperature sensorsAs it can take up to 0.75 seconds for the controller to get a reading from a DS18B20 sensor, and since sometimes digital sensors output spurious data, there have been some modifications made to the logic which decides when the circulation pump should be turned on and off, but all the original functionality of the 2013 controller has been retained.

This controller is ideally suited for use with swimming pool and hot tub solar water heating systems as well as many other applications where having waterproof temperature sensors is essential.

We will shortly be adding this new product to the REUK Shop, but in the meantime, if you are interested in purchasing this controller or something similar to meet your exact requirements, email neil@reuk.co.uk.

Project of the Day – Low Voltage Disconnect for Powered Snorkel

Today’s project was a very particular low voltage disconnect for a powered snorkel system for recreational divers. The diver’s face mask is connected to a 5 metre long hose which is in turn connected to a buoy floating on the surface. A 12V battery powered diaphragm pump forces air from the surface down to the diver to breathe. Using such a system as opposed to scuba has the benefit of requiring no certification, gives a safe fixed maximum diving depth, and is lightweight and non-polluting.

6 volt 8ah agm battery

The system is powered by two series-connected 6V 8Ah AGM batteries (a type of deep cycle battery which is sealed and can be used inverted) and gives 1 hour of dive time before needing to be recharged. The problem is how to let the diver know that the battery is low and protect the batteries from being overly discharged.

A piezo type warning buzzer could not be used since in a group of divers underwater it would be very difficult to ascertain whose buzzer was sounding, and a warning light would not work since this system would be used in tropical waters in bright daylight at shallow depths.

A generic low voltage disconnect could also not be used since it would just cut off the pump and therefore the air to the diver with no warning when the battery voltage breeched the set low voltage level. Instead something was required which would over the course of a few minutes cycle the pump on and off to reduce the air pressure to the diver forcing them up to the surface. (The system is an open circuit with a rebreather bag, and so turning the pump on and off reduces the pressure of the air supplied, but does not result in there being sufficient air one second, and then no air at all the next.)

There are commercial PWM (pulse width modulation) solutions available, but they are very expensive and could not give the exact shut down sequence desired – bringing the air pressure down to 90%, 80%, 70%, 60%…and so on over three minutes when the battery voltage gets low.

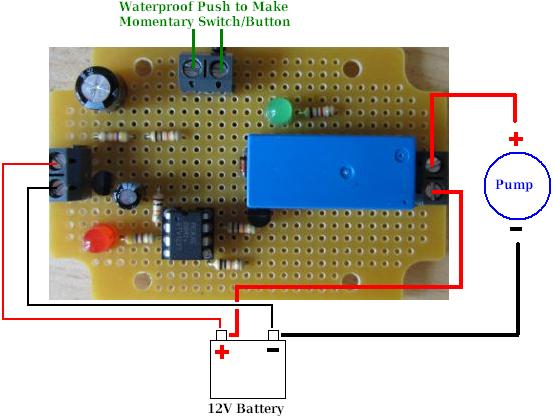
powered scuba low voltage disconnect controller

Therefore we made the special low voltage disconnect controller pictured above. This device constantly monitors the battery voltage, and when it falls and remains below a set threshold (11.2 Volts) the shut down sequence begins.

For 20 seconds the pump is off for 1 second then on for 9 seconds, off for 1s then on for 9s. Then for the next 20 seconds the pump is off for 2 seconds on for 8 seconds, off for 2s on for 8s. This process is repeated every 20 seconds increasing the pump off time and therefore reducing the air pressure to the diver so they have to surface, but can do so safely and without panicking.

Offer of the Day – 88Ah Deep Cycle Battery £56.95

88Ah deep cycle solar leisure batteryOur recommended offer of the day is this 12V 88Ah deep cycle battery offered in the UK at just £56.95 including delivery (to mainland UK locations south of Glasgow/Edinburgh). As the image above shows, order this battery before 4pm to have it delivered next day, and it comes with a 4 year warranty.

This battery has dimensions of 257 x 172 x 220mm and is suitable for solar charging as well as for general leisure and marine usage.

Click here for more information or to buy this 88Ah 12V battery now at this low price.

Bricking a Beaglebone Black

In a previous article we introduced the Beaglebone Black – a low power, low cost, credit card sized Linux computer available in the UK for around £35 and just $45 in the USA. We have been using the Raspberry Pi since it was first released in early 2012, so we were very interested to try out this similarly priced alternative which promised greater processor speed, 2GB of on board eMMC flash memory for the operating system, and most importantly for the work we do, 7 analog (ADC) inputs compared to zero on Raspberry Pi.
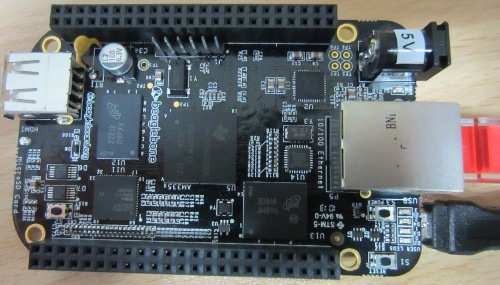
Beaglebone Black - low cost Linux computer

We received our Beaglebone Black (pictured above) around a week ago, and have been playing around with it in any spare time. Getting it set up was very quick and easy following the instructions served up as a webpage from the BBB itself. But then today something went wrong.

While looking on the internet to find any recommendations/suggestions for a VNC (virtual networked computing) server for the BBB I found this recent blog posting by Roger Meike which went through the steps he took to successfully install the X11 VNC server on his Beaglebone Black. This enabled him to interact with its full graphical interface / desktop through his Mac instead of having to hook the BBB up to a separate monitor or TV or only being able to use the command-line interface terminal via SSH.

So, step one, connect the Beaglebone Black to the ethernet cable and USB cable – check everything is working as it should via SSH.  Step two, update and upgrade the Ångstrom Linux distribution installed on the Beaglebone. So far so good – seemingly. The command opkg update took very little time to run to completion; the command opkg upgrade took the best part of an hour and a half to run, but didn’t show any errors, and after it was completed everything was working as it had previously – no problems evidenced at all.

Before embarking on the X11 VNC server installation I decided to reboot the Beaglebone Black, so I entered the reboot command. Next time I looked at the BBB a few minutes later 3 of the 4 user indicator LEDs were fixed on instead of their usual flashing. I attempted to SSH in but could not connect, and entering http://192.168.7.2 via my web browser (which is the usual way of accessing the BBB when it is connected to your computer via USB) resulted in ‘This webpage is not available’ error message.
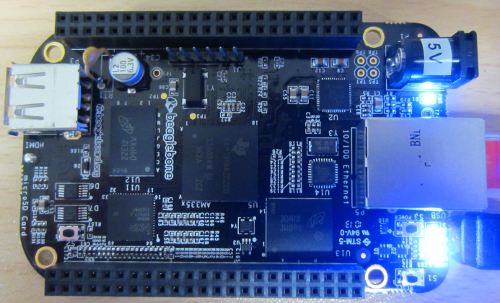
Unresponsive Beaglebone Black after update and upgrade

It appeared that something had gone wrong somewhere, but the start up guide mentioned that the LEDs are fixed on while the eMMC is being flashed with a new distribution from the SD card and that process can take up to 45 minutes. On the off chance that upgrading the distribution without the SD card results in the same thing (and not wanting to turn it off if it was actually doing something), I left the BBB alone for a couple of hours, but the LEDs just stayed on.

I next pressed the on board reset button. The LEDs turned off, then one turned on (PWR LED), then another turned on (labelled D2), and then a few seconds later LEDs D3 and D4 turned on and stayed on permanently.
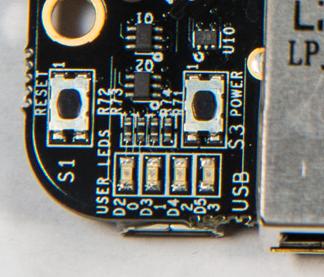
Beaglebone black user LEDs

Next I unplugged the USB cable and left the Beaglebone Black disconnected from the power that cable supplies for a few minutes. When I reconnected the USB cable to the computer, nothing happened – the computer could not see the BBB whereas it previously recognised it immediately as a USB mass storage device when it was connected. But the LEDs still came on.

I tested there was nothing wrong with the USB port on the computer – it was fine; I tried connecting the BBB to alternative USB ports on the computer, and still nothing, just the LEDs permanently fixed on.

I then hooked the BBB to a monitor via HDMI, but still nothing. It seems that it has turned into an illuminated brick.

Looking around on the internet I found this guide to unbricking Beaglebone Black without Erasing eMMC, as well as comments from other people who have run into similar problems with their BBB. It seems the only way to fix this is to download the latest Ångstrom distribution on another computer, unzip it, get an image writer for Windows, write the image to the SD card, boot from the SD card, and then wait for the image to be copied across to the eMMC. But, this requires a microSD card which I don’t have, and a lot more time. Also, quite a few stories of people going through this process and ending up with an un-bootable BBB. Is it necessary to do this every time the distribution needs updating??

I’ve never had any problems with any Raspberry Pi, and I have some which have been running continuously for months without crashing or any other issues. Therefore this bricked Beaglebone Black is going to be returned – not to be exchanged for another Beaglebone, not for a refund, but for another Raspberry Pi. Sometimes the grass is not greener on the other side – I just wish that the Raspberry Pi GPIO included some analog inputs!

As Nigel D wrote regarding the advantage of Pi over BBB: having the boot stuff and OS on removable media means that bricking the board is that much more difficult, makes it easier to experiment between different operating systems, and makes full backup and recovery easier.
Special Offer of the Day – 20W PV Solar Panel £25.99

While the price per Watt of PV solar panels has been tumbling, the cost of smaller solar panels (<30 Watt) have remained relatively high in most cases because of the fixed costs of postage, and manufacturing without the benefit of scale.

Smaller panels are particularly useful for battery powered outdoor projects such as shed lighting, electric fencing, irrigation systems, and much more.

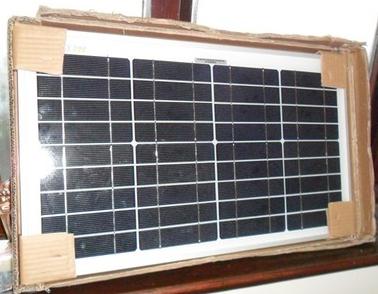
20 watt PV solar panel special offerPictured above is our special offer recommendation of the day – a high quality 20 Watt monocrystalline PV solar panel for just £25.99 plus £2.99 postage (and no extra postage if you purchase 2 or more of these panels).

This panel is 363mm x 529mm x 25mm in size and 2.5Kg in weight, and is fitted with 1.5 metres of cable and a bypass diode to prevent reverse discharge at night.

Click here for more information or to snap up one of these panels now: 20 Watt PV Solar Panel Offer.

Low Voltage Disconnect with Display and Datalogger

Our user-programmable low voltage disconnect (LVD) circuit remains one of our most popular products – very useful to protect batteries from deep discharge damage.

One request we have received many times is for an LCD (liquid crystal display) to be added to our low voltage disconnect circuits so that the actual voltage of the battery being monitored is shown together with other useful information such as the low voltage disconnect set point, state of the system, and so on.

A second request is for some datalogging of the voltages measured – ideally to be displayed on an LCD. Therefore we have developed a new REUK low voltage disconnect circuit with LCD and data logger to meet both of those requirements.

low voltage disconnect with LCD and data logger

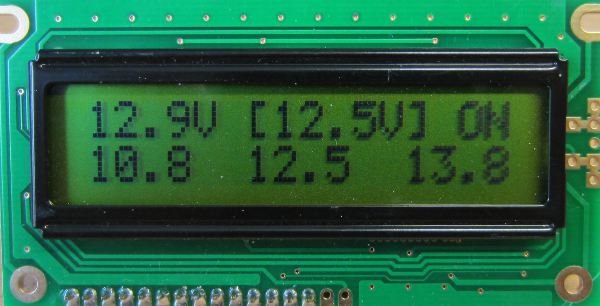
We have attempted to make this device as useful as possible while being as simple as possible to use. The LCD pictured above from our prototype shows (from top left to top right) the current voltage measurement (updated every 0.1 seconds), the target voltage for change of state (in this example 12.5V is the voltage below which the low voltage disconnect will engage), and the state (in this case, output ON).

The bottom row shows the data from the data logger, from left to right, minimum voltage logged, average (arithmetic mean) voltage logged, and maximum voltage logged.

The voltage measured is logged once every just over 7 minutes, with the most recent 200 measurements logged. That gives a 24 hour record of the battery voltage which is very useful for identifying problems and understanding battery usage.

reuk LVD with LCD and data logger

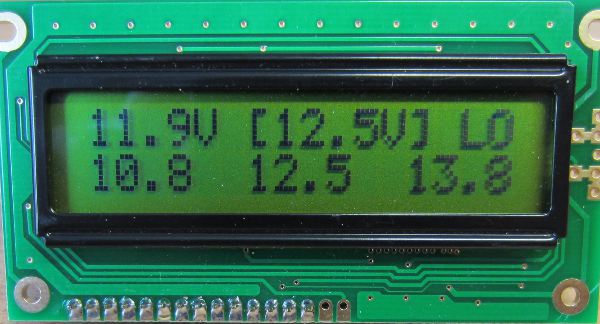
In the screenshot above, the state is now ‘LO’ since the measured voltage (11.9V) is below the LVD voltage (12.5V). After 10 seconds of this state being maintained, the output would be turned off automatically and only turn back on after 10 seconds of the measured voltage exceeding the LVD cancellation voltage.

The user can easily set the disconnect voltage and cancellation voltage using the display and a button on the LVD circuit, and the datalog can also be cleared by the user. All data is retained by this LVD circuit even when it is disconnected from the battery.

If you are interested in purchasing a low voltage disconnect circuit with display and datalogger, email neil@reuk.co.uk with details of your exact requirements.

Offer of the Day – 80W Monocrystalline Solar Panel £71.98

With the EU about to impose high tariffs on imported PV Solar Panels, and prices of solar panels likely to increase soon for other reasons, now is definitely the time to get your hands on some competitively priced panels.

80w monocrystalline solar PV panel - 12VDC

Our recommended offer of the day is this 80W 12V monocrystalline PV solar panel best priced at just £71.98 while stocks last. It weighs in at around 8kg and has 1205mm x 545mm x 35mm dimensions.

The panel is fitted with a sturdy aluminium frame, a waterproof wiring box, and is supplied with solar cable, plugs, and bypass diodes fitted.

Click here to purchase one or more of these panels or for more information: 80W PV Solar Panel. The panels are despatched from Germany quickly and well packaged in our experience.

Low Voltage Disconnect – User Programmable Set Points in Binary

Our REUK Programmable Low Voltage Disconnect (LVD) is a product which is used to protect batteries from being excessively discharged and therefore permanently damaged. The user of this device can set the voltage at which the low voltage disconnect is activated, and a second higher voltage at which it is cancelled.

In programming mode, each button press reduces the low voltage by 0.1V from a default value of 12.5V, or increases the cancellation voltage by 0.1V from a default value of 12.0V. For example, they would press the button 7 times to set the low voltage to 11.8V (12.5-0.7V) or 9 times to set the cancellation voltage at 12.9V (12.0+0.9V).

This method of user data entry works very well as it is simple and much cheaper than using a digital display or digital keypad BUT where it does not work so well is in situations where the low voltage is to be set very low, or the cancellation voltage very high – for example, to set a low voltage of 10.0V would require 25 button presses. That is not convenient, and so many button presses increases the likelihood of the user making a mistake.

low voltage disconnect with binary entry of cut out and cut in voltages

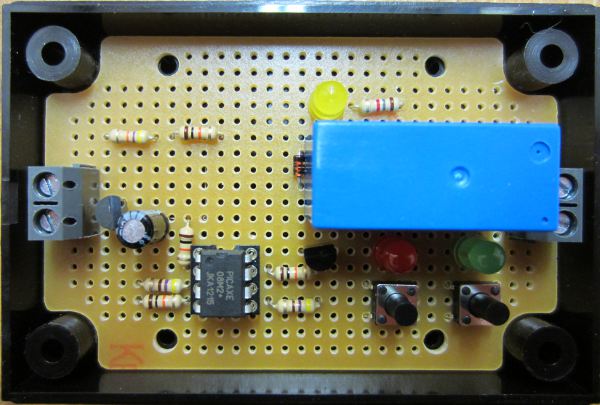
To get around this occasional issue we have come up with an alternative design (prototype pictured above) which enables the user to enter the voltage set points using binary via a couple of buttons with corresponding red and green LEDs.

Let’s say someone wants to set the low voltage set point to be 12.4V. Removing the decimal point gives us 124 which is 1111100 in binary (just type a number followed by ‘in binary‘ in google to find out its binary value). The user enters this binary value pressing the red button for a ‘0’ and the green button for a ‘1’. The LEDs then replay the sequence of 1’s and 0’s for visual confirmation of correct data entry, and that’s it – the unit is programmed.

More Technical Detail

We were going to use an 8-bit value for the voltage entry, but that gives a maximum value of binary 11111111 which is 255 in decimal. Since we want our LVD’s to be suitable for 24V battery systems without software modification, 25.5V is almost always going to be too low and so 8 bits is simply not enough. Therefore we changed the design to 16-bit (maximum decimal value 65535) but this means that for the expected maximum voltage of 30.0V we have for the decimal value of 300 a 16-bit binary value of 0000000100101100. This has a lot of leading zeroes which again increases the chance of the user making a mistake – therefore in the final design the user enters the binary value starting with the least significant bit (i.e. going from right to left) and any leading zeroes (which are now following zeroes) are added automatically by the microcontroller.

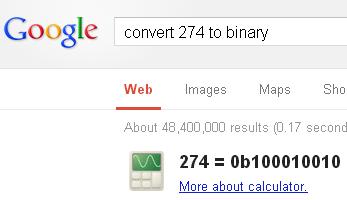
For example, if a user with a 24V battery system wanted a cancellation voltage of 27.4V, they would type in the Google search box convert 274 to binary and get the following result:

convert decimal value to binary

The leading 0b just tells you that what follows is in binary – 100010010. The user then uses the red and green buttons to enter this binary value starting from right to left 0-1-0-0-1-0-0-0-1, and that is it – 27.4V has been successfully saved in the device.

Project of the Day – Swimming Pool Solar Water Heating Controller with Max Temperature

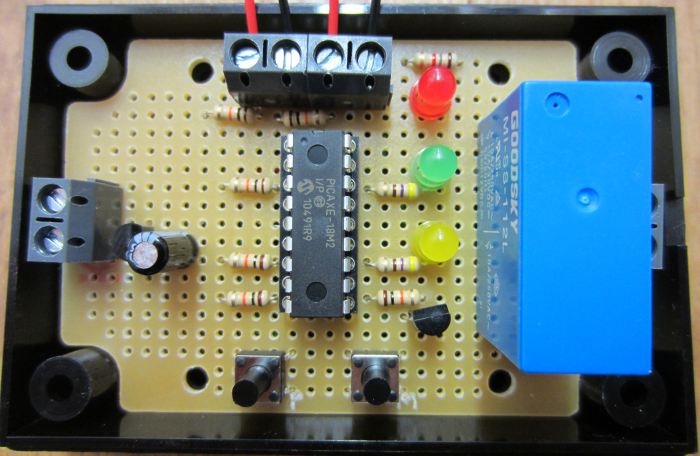
Today we have been working on a new solar water heating pump controller for use with a swimming pool with a user-settable maximum water temperature. This can be used to keep hot tubs at a safe temperature, or keep a swimming pool from getting unpleasantly hot.

This new device is based around our latest 2013 Solar Water Heating Pump Controller with the new features added on.

Swimming pool solar water heating controller with max temperature controlIn terms of hardware we have moved from a PICAXE-08M2 to a PICAXE-18M2 for its additional input/output pins, and then just added the yellow LED and second push button.

The operation of the controller is unchanged from the 2013 controller with the addition of the following functionality:

User can set maximum temperature the pool should reach to 1 degree accuracy from 25 degrees Celcius up.

If pool reaches the maximum temperature, the pump will turn off and not turn on again until the pool temperature has fallen by at least 2 degrees Celcius (hysteresis).

User can disable the maximum temperature feature or enable it with the push of a button.

If you need a controller of this type for your solar heated pool or hot-tub, do not hesitate to contact us via the REUK.co.uk website.