Archery Timing Circuit

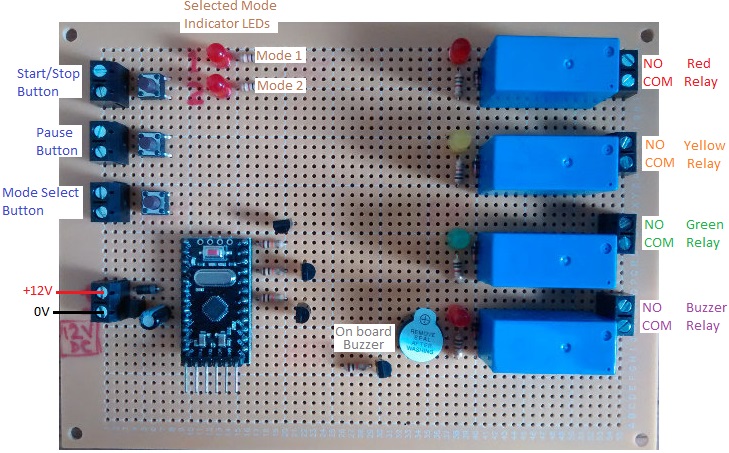
timing circuit for competitive archery trainingPictured above is a timing circuit for archery competitions. Outdoor archers shoot six arrows in one go and are allowed 4 minutes. Indoor archers shoot three arrows in one go and are allowed 2 minutes.

The user can select one of two options – option 1 (outdoor) and option 2 (indoor) for either a two minute or four minute competition. The controller board itself has a red, yellow, and green LED on it and a small buzzer. There are also four relays which can control larger lights – e.g. when the red LED is illuminates, a relay will be closed which can control multiple large red lights. The same is repeated for each LED and also for the buzzer relay which can control multiple buzzers or sirens.

The Mode button is used to select the desired timing option. The red LED will be on while the controller is sleeping. When the Start/Stop button is pressed, the timer starts and the green LED turns on. With the outdoor timing option, the green LED stays on for 3 minutes and 30 seconds. With the indoor timing option, the green LED stays on for 1 minute and 30 seconds. Then the yellow LED turns on to give the archer notice that their time is running out. After 30 seconds the red LED turns back on again and the buzzer sounds briefly to indicate that time is up, and the device is reset ready for the next archer.

While the timer is running, you can press the Start/Stop button to cancel the timer and reset the controller. Alternatively, you can press the Pause button to pause the competition. The buzzer sounds 3 times quickly to indicate that the competition has been paused and then when the Pause button is pressed again, the buzzer sounds 3 times. The timer continues from where it left off exactly after the buzzer sounds for the third time.

If you need any kind of bespoke timer device, email neil@reuk.co.uk with details of your exact requirements.

Pistol Shooting Training Timer

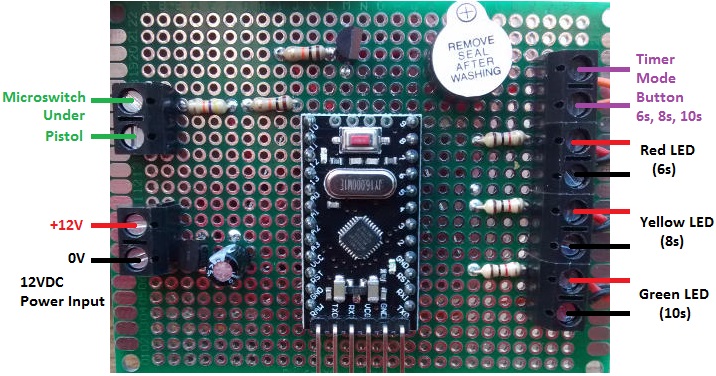
Competitive pistol shooting trainer timerPictured above is a timer we recently made for use in competitive pistol shooting training. There is a microswitch under a flat plate on which the pistol lies. When the shooter picks up the pistol, the timer starts counting down a user set value of either 6, 8, or 10 seconds after which a buzzer sounds briefly telling the shooter to replace the pistol. The duration of the timer is set using a button to step through the three possible options, with an LED (red, yellow, or green) illuminated to show the currently selection option. This will all be fitted inside an enclosure with the microswitch connected through the circuit board, and the LEDs and timer mode selection button mounted in the lid of the enclosure.

This timer is built around an Arduino Pro Mini board and uses its internal clock for timings as it is accurate enough over such short timing intervals (+/-1 millisecond or better over 10 seconds) when considered in conjunction with the time it takes the microswitch to open/close, or sound to actually start to emit from a buzzer when it is first powered.

If you need any kind of special timer, please email neil@reuk.co.uk with details of your specific requirements.

Using the Buttons on a TM1638 Module with Arduino

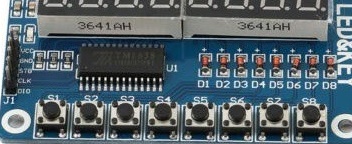
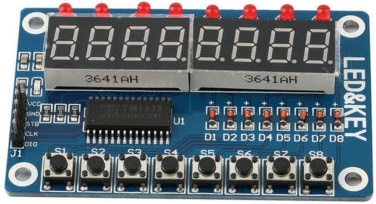
Following on from our recent blog post on using the 8-digit 7-segment display on TM1638 modules with Arduino, here we will look at taking advantage of the eight push buttons on a TM1638 module (labelled S1 to S8 in the photograph below). Click here to buy TM1638 modules for under £2 delivered.

The array of 8 user input buttons on a TM1638 module - used with ArduinoThe tm1638 library for Arduino has a function getButtons():

byte buttons=module.getButtons();

…which returns an 8-bit byte value which tells you which of the eight buttons are currently being pressed.

Press the left most button S1, buttons returns 1, press S2 and get 2, press S3 and get 4, press S4 and get 8, S5=16, S6=32, S7=64, and S8 returns 128. Pressing multiple buttons at the same time results in buttons having a value equal to the sum of the values for the individual buttons being pressed – e.g. press S1 and S2 simultaneously and the value of buttons will be 1+2=3.

If only one button is being pressed at a time, then you can easily test for it – e.g. if buttons is equal to 64, we know that button S7 is being pressed; but if S7 is pressed simultaneously with another button, the returned value of buttons will not be equal to 64, and without doing some messy calculations, we cannot know which other button(s) have been pressed.

Here is the code required to display the 0-255 value of buttons on the LED display of the TM1638 corresponding to the button(s) currently being pressed.

buttons=module.getButtons();
module.setDisplayToDecNumber(buttons,0,false);

We know that the value of buttons is always a number between 0 to 255 – an 8-bit byte. Knowing that 1 = 00000001, 2 = 00000010, 4 = 00000100, 8 = 00001000 etc in binary, we can simply examine the bits of the byte, and where we find 1s, we know that the button corresponding to that bit is being pressed.

If S1 and S3 are pressed simultaneously for example, module.getButtons() will return the value 4+1 = 5 which is 00000101 in binary. The bit furthest to the right (the least significant bit) corresponds to S1, the second from the right to S2, the third from the right to S3, and so on. 0 indicates not pressed, and 1 indicates pressed.

With Arduino we have the handy function getBit(x, n) where x is the byte to be examined, and n is the position of the bit within that byte to be checked – 1 for the least significant bit to the right, and increasing as we move left to the more significant bits.

(Note that as the 8 LEDs on the TM1638 are controlled using an 8-bit byte also, if you get the value of the byte buttons=module.getButtons(), you can illuminate the corresponding LEDs with module.setLEDs(buttons). For example, module.setLEDs(1) will illuminate the first (left most) LED, module.setLEDs(128) will illuminate the last (right most) LED. With this code, whichever button(s) are pressed, the corresponding LEDs will all light up simultaneously.)

Below is an example Arduino sketch we have written to show how the TM1638 buttons can be tested individually to see if they are currently being pressed. The function we have written isButtonBeingPressed(buttonNumber) is used to test if a particular button (from 1 to 8) is currently being pressed. Knowing that button is being pressed can be used for user inputs to control your projects.

/*
 * REUK.co.uk - February 2016
 * Useful function to test if one of the eight user input buttons
 * on a TM1638 module is currently being pressed.
 */

// The byte buttons is the value returned by the TM1638 to indicate
// which buttons are currently being pressed.
byte buttons;

#include <TM1638.h>

// define a module on data pin 8, clock pin 9 and strobe pin 7
TM1638 module(8, 9, 7);

void setup(){}

void loop(){
 // The buttons S1 to S8 have the following values:
 // S1 = 1, S2 = 2, S3 = 4, S4 = 8, S5 = 16, S6 = 32, S7 = 64, S8 = 128
 // If multiple buttons are pressed simultaneously, add their values together.

 // DEMONSTRATION - Loop through the 8 buttons, testing each to see if it is
 // currently being pressed. If a button is being pressed, show its number (1-8)
 // on the LED display...Leave it displayed until a different button is pressed.
 for(int buttonToTest = 1; buttonToTest < 9; buttonToTest++){
   // Let the TM1638 process the button inputs
   buttons = module.getButtons();
   if(isButtonBeingPressed(buttonToTest)){
     // This button (buttonToTest) has been found to be pressed, so display it's number S1-S8
     module.setDisplayToDecNumber(buttonToTest, 0, false);
   }
 }
}

// This function will return true if a particular button n is currently being pressed.
boolean isButtonBeingPressed(int n){
 // Button 1 status shown by bit0 of the byte buttons returned by module.getButtons()
 // Button 2 status shown by bit1 or the byte buttons ...
 // Button 3 status shown by bit2...etc

 // n - the number of the button to be tested) should be an integer from 1 to 8
 if(n < 1 or n > 8) return false;

 // Read in the value of getButtons from the TM1638 module.
 buttons = module.getButtons();

 // Which bit must we test for this button?
 int bitToLookAt = n - 1;

 // Read the value of the bit - either a 1 for button pressed, or 0 for not pressed.
 byte theValueOfTheBit = bitRead(buttons, bitToLookAt);

 // If the button is pressed, return true, otherwise return false.
 if(theValueOfTheBit == 1) 
   return true;
 else 
   return false;
}

Arduino Code for Displaying Numbers on TM1638 Module Display

In a recent blog post, we introduced the TM1638 module – a device with multiple input, output, and display functionality available at a very reasonable price, and perfect for use with an Arduino board. Click here to buy TM1638 modules for under £2 delivered.
TM1638 Arduino Display Module

Of most interest to us was the pair of 4-digit 7-segment LED displays which can be driven by just three Arduino output pins (in addition to 8 LEDs and 8 input buttons). The majority of the products and bespoke devices we build and sell have a display to show measured voltages or temperature sensor readings. As the voltages measured are always from 0-35V, and the temperatures range from 0-99 degrees Celcius, we planned for each 4 digit display to show these values to two decimal places – e.g. a voltage of 12.45V (since the decimal point is included as part of the second digit unlike on LCD displays where the decimal point uses up a whole character).

An excellent and easy to use TM1638 library is available for Arduino, but did not have exactly what we needed. We want to be able to take any number from 0 to 99.9 and display it to either 1 or 2 decimal places on either the left or the right of the two 4-digit displays. In order to try and achieve this we wrote a simple rough and ready function which is provided in full at the end of this post for you to use, and is explained below.

Every one of the seven segments of each of the eight digits can be individually controlled for a total of 56 controllable segments. After installing and importing the tm1638.h library in a sketch and defining our module – refer to the excellent Introduction to TM1638 for details on getting started with TM1638 modules, the following code can be used to illuminate each of the segments on one digit each.

byte values[] = { 1, 2, 4, 8, 16, 32, 64, 128 };
module.setDisplay(values);
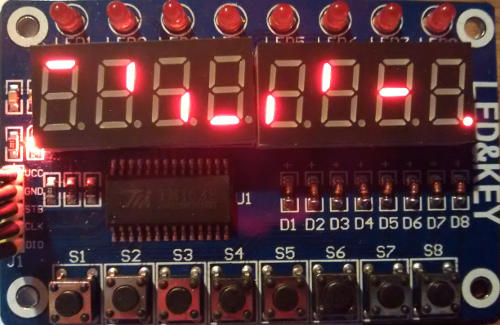
TM1638 module showing each segment being illuminated individually

The array of bytes values[] holds eight elements (values from 0-255) . The first element controls the first digit, the second element the second digit, and so on. So, the first element has a value of 1 and this illuminates the top segment of the digit. The second element has a value of 2 and this illuminates the top right segment. And so on all the way up to the eighth element which in this case has a value of 128 which illuminates the decimal point of the eighth digit.

In order to illuminate multiple segments of the same digit, you simply add together the values for the segments to be simultaneously illuminated for a digit, and enter that value in the array for the digit where you would like it to be displayed.

For example, the value to display an 8 (all segments of a digit illuminated) is 1+2+4+8+16+32+64=127. If you were to fill the byte array entirely with 127’s, the display would show eight number 8s in a row.

In order to follow a number with a decimal point, you add 128 to the byte value for the number you would like to display. For example, the number 1 is given by 2+4 (illuminating the two right side segments of the digit). To do 1. you add 128 to the byte value for the number 1 to give 134. Every 134 in the byte array will result in a 1. being displayed.

Now that we know how to display any number (or character) for any digit on the displays, all that is left to do is to take the 0-99.9 valued number, break it out into its constituent digits, and display them where we want them to appear on the display.
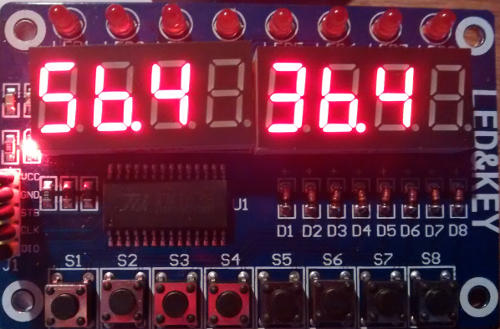
TM1638 module used as display for Arduino solar water heating pump controller

The above image shows the TM1638 module tested for use as the display for one of our solar water heating pump controllers. The value on the left is the solar panel temperature, and the value on the right is the hot water tank (or pool) temperature. In this example, we have displayed the sensor readings to 1 decimal place since the sensors are not accurate to 2dp, and if all eight digits are illuminated at the same time, it is not very easy to read the two temperature values displayed. (For our typical usage, it would be better if the two 4-digit displays were a couple of centimetres apart from each other, but other uses necessitate a full 8-digit display which requires them to be close together.)
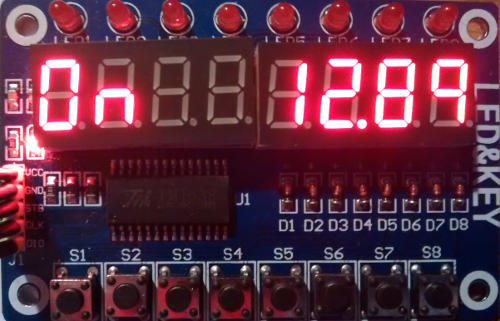
TM1638 used as low voltage disconnect display with Arduino - showing voltage and status

Above we have used the TM1638 module as the display for our 12V low voltage disconnect. In this case we only have one voltage measurement to display, but it is very accurate, so we have displayed it to two decimal places. That leaves us four characters to use to show system status information, in this case On (output is on because battery voltage is good). On is made with byte values 63, 84.
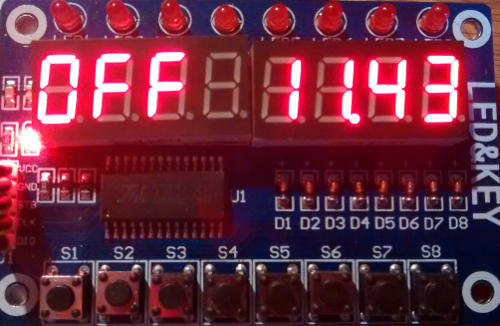
TM1638 module used as a display for an Arduino low voltage disconnect

…and above we have Off as the battery voltage has been measured to be low. Off is made using byte values 63, 113, 113.

So, that just leaves the code itself. As mentioned earlier, it is quite ugly code – it could have been written more elegantly and efficiently, but it is fully commented and hopefully simple enough to understand and modify to your particular needs or  as a jumping off point for learning and for experimentation.

This sample code just displays a number (12.5432334) to two decimal places on the LEFT four digits of the display; but you can change the number, change the position, and change the number of decimal places by amending the contents of the loop() function. You can simultaneously display a number on the right of the display by calling the displayNumber() function a second time within loop() and having your chosen number displayed on the RIGHT.

If you try and display a number below zero or of 100 or over, the display will just show —- to indicate an error.

/*
 * REUK.co.uk February 2016
 * Displaying two 1 or 2dp values less than 100 on a TM1638 module.
 * 
 * An excellent starter guide to the TM1638 modules is available here:
 * http://tronixstuff.com/2012/03/11/arduino-and-tm1638-led-display-modules/
*/

// include the TM1638 library (which you must first install to your Arduino IDE).
#include <TM1638.h>

// Define a module on data pin 8, clock pin 9 and strobe pin 7
TM1638 module(8, 9, 7);

// Define constants for left and right so we can easily choose 
// which side of the display to show our number
#define LEFT 0
#define RIGHT 1

// displayDigits[0] = 63 which displays a 0
// displayDigits[1] = 6 which displays a 1
// displayDigits[2] = 91 which displays a 2...etc
// Add 128 to value to display the same number with a dp following it.
// e.g. display a 2 with 91, display a 2. with 91+128=219
byte displayDigits[] = {63,6,91,79,102,109,124,7,127,103 };

// An array for the values to be displayed - all zeroes means show nothing.
byte values[] = { 0,0,0,0,0,0,0,0 };

// The digits which will make up a number to be displayed
// e.g. 25.63 will fill theDigits array with values of 2, 5, 6, and 3
int theDigits[] = { 0,0,0,0 };

void setup(){
 // Start with the digital display blank.
 module.setDisplay(values);

 // Set the display to low intensity. High intensity is very bright and
 // uses more power.
 module.setupDisplay(true, 2); // where 7 is intensity (from 0 to 7)
}

void loop(){
 // This is an example number from 0 to 99.9999 you would like to display.
 float theNumberToDisplay = 12.5432334;

 // Where do you want to show the number, on the LEFT side, or the RIGHT of the display?
 int positionToDisplayIt = LEFT;

 // How many decimal places to show - must be 1 or 2 in this example code
 int numberOfDecimalPlacesToShow = 2;

 // Call the function to display the number
 displayNumber(theNumberToDisplay, positionToDisplayIt, numberOfDecimalPlacesToShow);
}

void displayNumber(float numberToSplit, int whichSide, int numOfDPs){
 // The number to be split should be a float from 0 to 99.9999
 // If is below zero or equal to or over 100, then just display ----.
 // numOfDPs is the number of digits after the point, only 1 or 2 are acceptable values
 if(numOfDPs > 2 or numOfDPs < 1)numOfDPs = 1;

 // Extract the digits from this number.
 numberToSplit = (int)(100 * numberToSplit);
 theDigits[0] = (int)(numberToSplit/1000);
 theDigits[1] = (int)((numberToSplit - (1000*theDigits[0])) / 100);
 theDigits[2] = (int)((numberToSplit - (1000*theDigits[0]) - (100*theDigits[1]))/10);
 theDigits[3] = (int)(numberToSplit - (1000*theDigits[0]) - (100*theDigits[1]) - (10*theDigits[2]));

 // Find and store the byte variables required to show these digits
 int dispDig[4];
 if(theDigits[0] == 0) dispDig[0] = 0; // Hide a leading zero if there is one
 else dispDig[0] = displayDigits[theDigits[0]];
 dispDig[1] = displayDigits[theDigits[1]] + 128; // Apend the dp onto the second digit
 dispDig[2] = displayDigits[theDigits[2]];
 dispDig[3] = displayDigits[theDigits[3]];

 // If we are only showing one DP, then leave last character blank to make things more legible on the display
 if(numOfDPs == 1) dispDig[3] = 0;

 // Make sure that the number passed to the function was >= 0 or <100, otherwise show an error with ----.
 if(numberToSplit/100 < 0 or numberToSplit/100 >= 100){
   for(int i = 0; i < 4; i++) dispDig[i] = 64;
 }

 // Find if number to be shown on the left or the right side of the display
 int offset = 0; // LEFT by default
 if(whichSide == RIGHT) offset = 4;

 // Update the values in the values array used by the display.
 values[0+offset] = dispDig[0];
 values[1+offset] = dispDig[1];
 values[2+offset] = dispDig[2];
 values[3+offset] = dispDig[3];

 // Update the display itself with the new values.
 module.setDisplay(values);
}
DS3231 Real Time Module used as Master Clock

Further to our recent post on using the DS3231 RTC module in situations where extremely accurate long duration timing is required, here is an example of a project we recently completed using this same module.

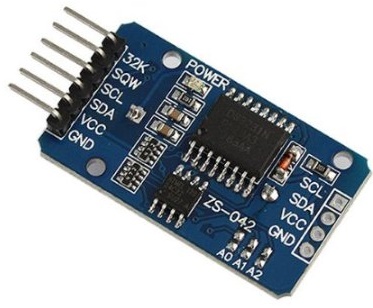
DS3231 Real Time Clock (RTC) module for Arduino

A Slave Clock is a clock which depends for its accuracy on another clock – the Master Clock. Our client has a Mercer UK slave clock which requires a 12V pulse once every 30 seconds for it to run accurately. He wanted an accuracy better than +/- a few seconds per week. As the DS3231 is accurate to better than 2ppm (parts per million), it will gain or lose no more than one second every six or so days.

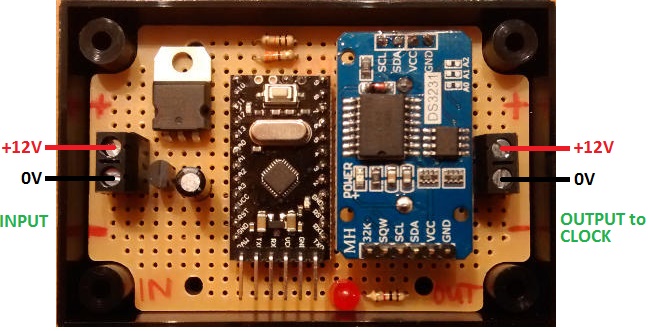
DS3231 Real Time Clock (RTC) with Arduino for Mercer Slave Clock time base

Pictured above is the unit we put together coupling a DS3231 module with an Arduino Pro Mini (clone) for the master clock. The Arduino constantly monitors the time from the DS3231, and each time the number of seconds in the time is 00 or 30, a half-second long 12V pulse is output to the slave clock.

Pictured below is one of master clocks fitted into the back of Standard Electric Time Company secondary (or slave) clock.

It is a double faced clock which is destined to hang in a small museum.

If you need any kind of accurate timer, please email neil@reuk.co.uk with details of your requirements.

Accurate DS3231 Real Time Clock as Alternative to DS1307

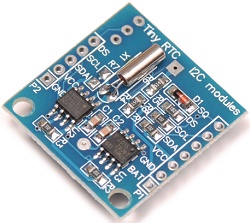
We have put together a lot of controllers which required a real time clock (RTC) – in particular dataloggers and other timers running over long periods of time which were required to do (or record) operations at specific times through the day consistently over weeks and months.

DS1307 real time clock (RTC) module for Arduino

Pictured above is a DS1307 module. These are available from just £1 including delivery from China/HK via eBay – see here: DS1307 Modules.

With a backup button cell (e.g. CR2032) on the underside of the module, these DS1307 modules will keep time even when disconnected from the main power source for months and even years on end. However, in our experimental projects (using this RTC with an Arduino for dataloggers amongst other things), we have found these DS1307 modules to vary hugely in their time-keeping accuracy – some gaining/losing a few seconds per day, and others gaining/losing as much as 3-5 minutes per day. While they have proved to be very consistent – i.e. a unit which gains 3 minutes per day will gain 3 minutes per day every day – having to test each unit individually over a few days and then modifying the Arduino project code to cancel out errors is not practical.

Some of the error is caused by ambient temperature changes affecting the accuracy of the timing of the crystal resonator. Some more of the error is also caused by the quality of the crystal itself and its attachment to the PCB in these economical modules.

DS3231 Real Time Clock (RTC) module for Arduino

Pictured above is an alternative to the DS1307 which we have found to be far superior in its time keeping accuracy which uses the DS3231. These are now also available on ebay from just £1: see here: DS3231 modules.

In extensive testing we have found the time-keeping of these modules to be excellent. The DS3231 chip on the module is marketed as being accurate to 2ppm (parts per million), which means less than one second lost or gained every 5 to 6 days. The units we have tested thus far have all come in at under 1ppm accuracy, so a couple of seconds at most lost or gained per month.

This accuracy is achieved in part by the incorporation of a temperature sensor in the DS3231 which can compensate for changes in ambient temperature. The measurements from this temperature sensor are also accessible to the user (accurate to +/- 3 Celcius) which makes for a handy extra feature. These DS3231 modules also have 32kb of available EEPROM memory which can be utilised by your projects, and many other useful features.

Click here for a very simple DS3231 introduction  from the Instructables website. If connecting a DS3231 module to an Arduino, you need to install the Arduino DS3231 Library from here which includes quite a detailed manual document to help you get started setting and accessing the stored time and temperature etc from your DS3231 module.

One thing to note is that due to recent changes to air mail postage rules, most of these modules are no longer sent out with a button cell (backup battery) provided (even when the eBay listing has one pictured). You will therefore need to source yourself a CR2025 or CR2032 button cell locally if you have a project necessitating backup for the time keeping.

Programmable Target Shooting Timer Relay Board

Target shooting relay timer controller with display

Pictured above is a target shooting timer relay controller with programmable options for different shooting programmes. With this device the user can set the number of seconds that the target is to remain edge-on to the shooter and how many second that it is to remain face-on to the shooter, and also how many cycles of edge and face the shoot will comprise.

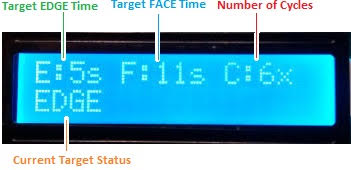
Target shooting timer display

The backlit display with this device shows the user programmed number of seconds that the target will edge (E) then face (F), and the number of cycles (C) for which it will be repeated. It also shows the current status of the target.

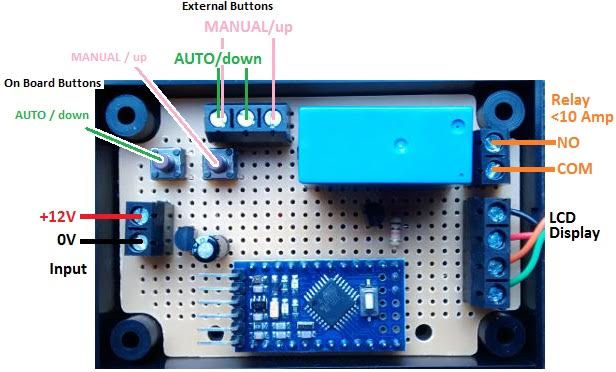
There are two buttons on the controller. The MANUAL button is used to enter the programming mode to set the timings for the programme and also to toggle the target manually between facing and edging. The AUTO button is used to start the programme. The programme starts by edging the target, and finishes also with the target edged.

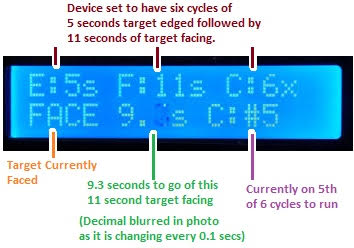
target shooting timer relay display in action

While the shooting programme is running, the display continues to show the user set programme values and the status of the target. It also shows a running countdown of the time remaining during this part of the cycle, and also which cycle the shooter is currently on.

If you need any kind of automated user-programmable timer for target shooting, please email neil@reuk.co.uk with details of your requirements.

Shooting Timer Instructions

Connect up the timer as shown in the connection diagram at the top of page making sure to use correct polarity for the 12VDC power input. The controller has buttons on board, but external push to make buttons can be connected in parallel to those as shown in the connection diagram.

Programming

To set the timings for your controller, press and hold the UP button for a couple of seconds until the display shows PROGRAMMING MODE. When you release the button, you will be prompted to ‘SET Edge time’. You can use the UP and DOWN buttons to change the displayed value within the range 1-99 seconds. Five seconds after you last pressed a button, whatever is displayed for Edge is saved in memory, and you will be prompted to ‘SET Face time’. Again the UP and DOWN buttons are used to change the displayed value within the range 1-999 seconds. (Since the face time can be set to a high value, if you press and hold the UP or DOWN button, you will be able to speedily increase or decrease the value.) Finally you will be prompted to ‘SET Cycles’. This can be set within the range 1-9 repeating cycles of the Edge/Face times.

The values you set in programming mode are saved in long term memory and are therefore retained if/when you disconnect and subsequently reconnect the power to the controller. You only need to repeat the above described steps if you want to change one or more of the saved values.

Using the Timer

In normal operation with your timings already programmed, the Manual/UP button can be used to manually toggle the position of the target. If the target is face on, press the button, and it will edge. Press the button again, and the target will be face on again.

The relay on the controller is closed when the target is edge on, and open when the target is face on. Therefore, when no power is being supplied to the target, it is expected that your target will be configured to be face on.

To run the timer, press the Auto/DOWN button. All cycles start with the target edge on, so if you have manually set the target to be face on, it will turn to edge on. As shown above, the display will show where you are in the programme, the countdown timer, the target status (edge or face), and which cycle you are currently on.

If you want to stop the timer when it is running, press the Auto/DOWN button again. The target will turn to be edge on if it is not already.

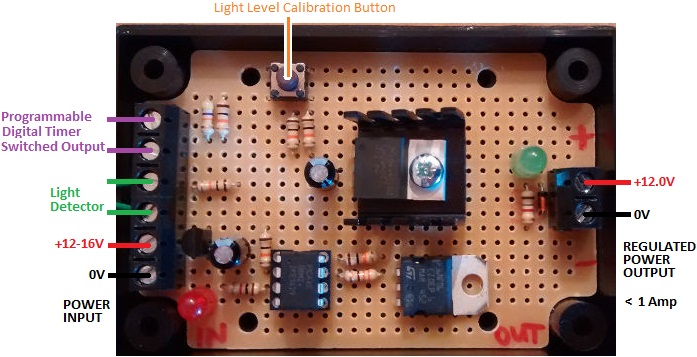
hen house lighting controller with digital timer and light detector

Pictured below is a new hen house lighting controller we recently made.

hen house lighting controller with programmable digital timer and light detector overrideThis device is designed to controller artificial lighting in hen and other poultry housing to trick the birds into thinking it is summer even during the winter so that their egg yield is kept high throughout the year. It is based around our REUK Poultry Lighting System but with a few modifications.

This particular version makes use of both a light detector and a programmable digital timer. The user sets the timer to turn ON before dawn and turn OFF after dusk. During the hours of darkness between the timer turning ON and dawn, and then between dusk and timer turning OFF, the artificial lights are turned on. The output from this device passes through a low-drop 12V regulator to protect LED bulbs from excessive voltage.

With the timer turned ON for 15 hours per day (e.g. from 4am to 7pm), the level of light in the hen house will be optimised for the birds’ laying; and the light detector prevents the artificial lighting being on when not necessary (due to ambient lighting) which reduces the cost and size of the solar panel and battery used to power the system.

If you need any type of automatic poultry lighting or door opening controller, email neil@reuk.co.uk with details of your exact requirements.

Air Pistol Shooting Target Controller

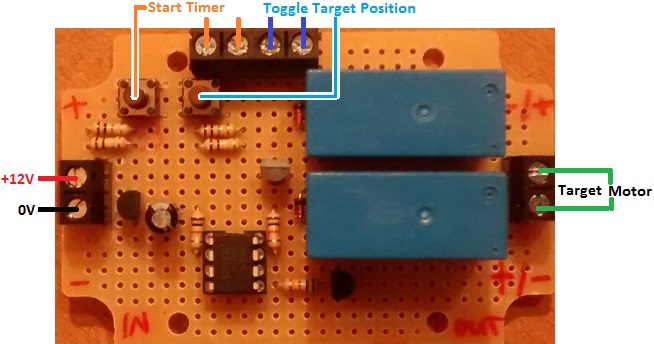
Pictured below is a controller we recently made for competitive air pistol shooting training.

Shooting Target ControllerOn the shooting range there is a target connected to a motor. If the motor is powered for one second with one polarity, the target will turn to face the shooter. If the motor is powered for one second with reverse polarity, the target will turn edge on to the shooter. (Click here to see how we reverse the polarity of a motor with two relays – alternatively, we could have used an H Bridge motor controller.)

The controller has two buttons, and also screw in terminals so that external buttons can be added in parallel if the controller is to be enclosed. One button is used to toggle the target position – to edge it when it is facing, and to face it when it is edge on. The second button is used to start the training routine.

When the start timer button is pressed, the target will be turned edge on to the shooter. Then after seven seconds, the target will be turned to face the shooter for three seconds. This edge for seven seconds face for three seconds is repeated five times, and then the target is edged to wait for the next shooter.

If you need any kind of automatic timer controller board, email neil@reuk.co.uk with details of your requirements.

12V Low Voltage Disconnect with Warning Buzzer

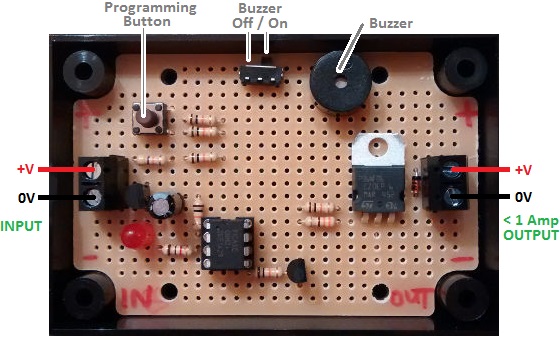
Pictured below is a 12V low voltage disconnect circuit with a low battery warning buzzer.

Low voltage disconnect with warning buzzer sirenWe sell a wide range of low voltage disconnect circuits in the REUK Shop as well as producing many bespoke LVDs on request. This particular circuit is based around our standard user programmable mini 12V low voltage disconnect, but enhanced to have a buzzer which sounds for one minute when the low voltage disconnect is triggered by 10 continuous seconds of low voltage measured on the battery. This warns the user that they need to take measures to recharge the battery.

There is also a switch on the circuit board so that the buzzer function can be turned off when not desired/required.

If you need any kind of low voltage disconnect, please email neil@reuk.co.uk with details of your requirements.