 In this article we will show you how to get everything you need installed and to get an LED flashing at your command (with minimal background information so that the key steps are not swamped with details of the Linux operating system, programming in Python, electric circuits, LEDs, and so on).
Installing wiringPi on the Raspberry Pi
wiringPi2 is a software library designed to make it easy (relatively!) to interface Raspberry Pi with external hardware. Follow our instructions to SSH into your Raspberry Pi: Connecting to Raspberry Pi from PC via SSH and after you login, you should have a terminal window with the prompt pi@raspberrypi ~ $ on your PC.
Now, click here to visit an external link which explains very clearly how to Install WiringPi2 for Python on the Raspberry Pi. With that installed you are ready to continue.
GPIO on Raspberry Pi

Pictured above are the pinouts for Raspberry Pi Rev 2, where pin 2 (shown in red) is at the corner of the board. For this example we are going to use GPIO 17 which is the 11th pin – 6th from the top on the left. To this pin we solder a thin piece of insulated wire, and to the ground pin (pin 6 – black) a second piece of insulated wire. (Note that rather than soldering directly to the Pi, is is much better to use a Raspberry Pi Cobbler as pictured below – which plugs onto the GPIO pins on the Raspberry Pi and connects via a ribbon cable to a small secondary circuit board with pins which can be inserted into a standard prototyping breadboard.)

The wire from GPIO 17 should connect to one leg of a 1K resistor, and the other leg of the 1K resistor to the positive (long) leg of the LED. The negative (short) leg of the LED should then connect to the wire which is connected to the GPIO ground pin.
Flashing LED Python Script
Now all we have left to do is write a Python script to control the output of GPIO 17. When that output is high, the LED will be on, and when it is low, the LED will be off.
Since we are using the command line interface on the Raspberry Pi via SSH, we use the text editor ‘nano‘ (click here for the Beginner’s Guide to Nano). At the command prompt type nano flashingled.py. This opens nano and creates a Python file (note the .py file extension) called flashingled.py.
The script to type in to this file is as follows – note that the script IS case sensitive, and the indentation IS significant and an essential part of the script. Indent using a single tab or three spaces:
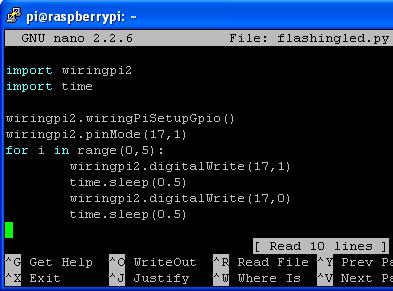
Press Ctrl-X to save the file and return to the command line.
To run your script enter the command sudo python flashingled.py, and if you have typed in the script above correctly, the LED connected to your Raspberry Pi will flash five times. While this script is running, you cannot do anything with your Raspberry Pi; it will wait for the script to run to completion. If instead you would like the script to run as a background process so that you can continue to interact with your Pi while the script is running, use the command sudo python flashingled.py & (note the ampersand ‘ &’ added to the end of the command).
Understanding the Python Script
To make the LED flash say 100 times, change the line for i in range(0,5) to for i in range(0,100).
The time.sleep(0.5) command makes the script wait for 0.5 seconds. Change the value 0.5 seconds to a longer or shorter duration – e.g. time.sleep(10) to keep the LED on (or off) for 10 seconds each time.
The command wiringpi2.digitalWrite(17,1) tells the Pi to turn on (1) the output of GPIO 17, and wiringpi2.digitalWrite(17,0) tells the Pi to turn off (0) the output of GPIO 17. If you had connected the LED to GPIO 21 then the ’17’ would simply be changed to a ’21’.