An easy introduction into DIY wind power generation is to make your own PVC wind turbine blades and fit them onto a permanent magnet alternator, Sturmey Archer Dynohub or stepper motor. However, if you want to build a high power wind turbine which can survive for 20+ years, wooden wind turbine blades are well worth the cost and effort.

Carving Wind Turbine Blades
Only basic tools are required for making wind turbine blades from wood – a drawknife (pictured above), saw, hammer and chisel, and a plane. If you have a power planer and a power band saw then the job will be much faster but the end result will be the same. Your first attempts will probably take about 10-12 hours per blade – if you take your time and work carefully – and you are likely to end up with a fewpractice blades while you are learning. But once you know what you are doing you will be able to work much faster and make fewer mistakes.
Choosing Wood for Wind Turbine Blades
Red Cedar is an excellent wood for wind turbine blades. It is easy to carve, has few knots and a nice grain, it is relatively inexpensive, and it is very strong and durable. If you are unable to obtain red cedar from your local timber merchant then ask them to recommend a similar alternative from the woods they have in stock.

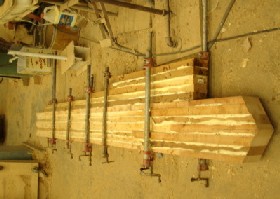
Particularly if you intend to construct long (and therefore thick) blades, you will really struggle to find suitable pieces of wood. Therefore it is much easier and cheaper to purchase standard lengths of 2×4 cedar and glue (laminate) them together. Standard woodworker’s polyurethane glue and a load of clamps is all you need for this job. The picture above (from OtherPower) shows how a blank was laminated for a 10 foot long wind turbine blade.
Protecting Wooden Wind Turbine Blades
Wind turbine blades take a battering from the elements. Apart from the wind and rain, the tips of the blades and leading edges spin through the air at great speed and will quickly wear down if not protected. It is possible to simply paint the blades with paint destined for the marine market, however it is better to use an oil which not only provides a protective skin around the blades, but also absorbs into the wood to keep out water. Boiled Linseed Oil is excellent for this role – a good few thick coats should be brushed on initially and then a new coat applied every year or so.
Wood varnish does not work well as it degrades badly over time in the sunlight. Aircraft leading edge tape, fiberglass, or epoxy resin can be applied to the leading edges of the blades to give extra protection – particularly if the wind turbine is to be located somewhere with frequent rain.
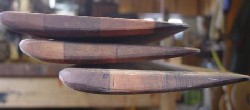
Pictured below are a completed set of OtherPower laminated red cedar wind turbine blades showing the beautiful shape of the carved aerofoil.

Useful External Links
There are many online resources to help you to select the correct size and shape for your wooden wind turbine blades. Here is a selection of some of the best.
Blade Design (PDF) – from Scoraig Wind which explains wind turbine blade design from first principles.
Carving Wooden Blades – again from Scoraig Wind. This a comprehensive guide to producing the blades for a 3-bladed low speed wind turbine
Blade Design Help – from Wind Stuff Now. This is a free tutorial in basic wind turbine blade design.
Simple Wind Turbine Blades – A simple formula for wind turbine blades from OtherPower. This is a very detailed photographic guide to carving wind turbine blades from wood and includes some useful hand drawn technical drawings which can be scaled up or down as required for your project.
Carving Wooden Wind Turbine Blades – DIY guide from Your Green Dream.
Carving Wind Turbine Blades – Some description and lots of ‘self-explanatory’ photographs of wind turbine blade carving by hand.